
The science behind color itself is at the heart of printing – and key to meeting the expectations you have for a beautifully printed project. The first step in understanding the boundaries of printable color is to know that the human eye can detect much more color than is possible for your computer monitor to display. In turn, your monitor can show more colors than it is possible to reproduce in offset printing.
The best illustration of this is a color gamut comparison chart where you can actually see the ‘real estate’ involved in each spectrum. (It’s always seemed odd to me that we use this illustration either on a printed page or a monitor… both of which are limiting the actual colors they are trying to represent!) In the figure below, the entire color shape represents all the visible spectrum of light.
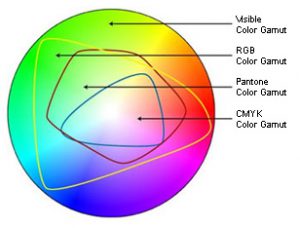
The RBG color area represents the specific wavelengths of light your monitor emits, and is clearly a much smaller area. Even smaller is the CMYK gamut showing colors that can be reproduced with printing inks. Cyan, Magenta and Yellow pigments (K or Black is added to create depth, definition and ensure a true black color) work as filters that subtract certain wavelengths of light and reflect others. They combine to create a spectrum of printable color.
Switching a file from RGB to CMYK in PhotoShop on your screen can visually show you the color shift that occurs when you switch to a more restrictive gamut. Try it on a random image and see if you notice a significant loss of color. Some printers prefer you leave your images in RBG mode with ICC profiles attached, while others prefer you go ahead and switch to CMYK mode, as that will inevitably happen before the printing process.
Most cameras and scanners capture color in RGB mode (or to get even more technical, the “sRGB” mode, or a standard definition of what colors can be shown on a computer monitor, as opposed to all the RGB colors that can be seen visually with reflective light). Some cameras have the aRGB (AdobeRGB) definition or a selection called “Raw” – it can capture more colors digitally than you will be able to see, but may be helpful when you edit and adjust your photographs in an editing program such as PhotoShop.
Printing methods are able to reproduce only a certain gamut of colors as well. When files contain colors that fall outside of that gamut, the RIP process must decide what to do with those colors – i.e., how to alter them in specific ways to make them become a color which is printable – and this is decided by the Rendering Intent options of the RIP software or printer driver. Rendering intents are mathematical formulas that alter out-of-gamut colors in predefined ways.
When an exact color match is needed on your print project, consider using a spot color ink in your design. Metallic inks also can give a great effect that isn’t possible with combinations of just the 4-color process inks. Paper or media choice will also affect and enhance the quality of printed colors.


