Why Did My Blue Print Purple?! How to Avoid the Color Shift

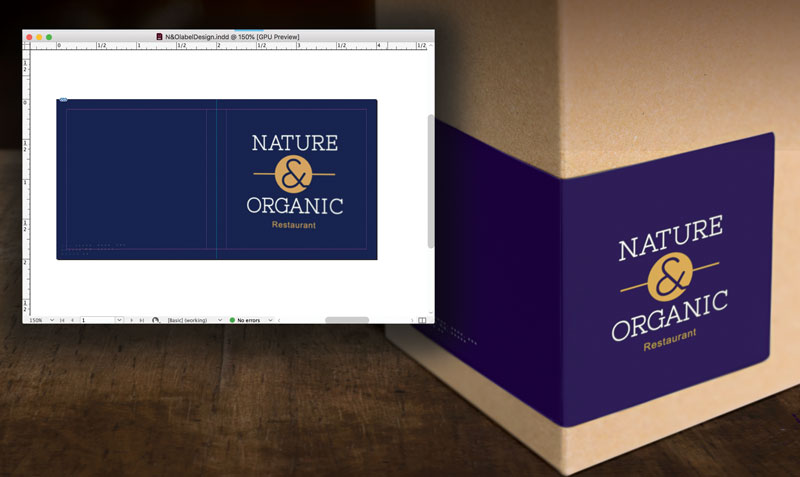
Blue Printed as Purple

“My perfect new reflex blue brand color printed PURPLE!”

Whether you are a designer or business owner who hired a designer,  you expect your color choices to look the same on paper as they did on your desktop monitor — and also the same on your boss’ cellphone where he viewed your proof, on your website where a coworker converted your design into a webpage, on signage, on packaging, and on all your marketing tools that will reach your audience. What sounds deceptively simple at first is actually a VERY tall order in a world where color reproduction and color perception are influenced by so many factors. 

That’s where the collaboration between a  trustworthy printer and experienced designer come to the rescue! Technology makes the creation, production, and sharing of amazing designs incredibly easy. And while color management is now standardized and more affordable than in comparison to “the old days,” it is NOT a given and requires more understanding and communication up front to avoid any pitfalls and nasty surprises at print time.  Digital speed has still not changed some basic, unalterable facts of the science of color and how our eyes perceive it. Your blue came out purple because of the divide between RGB and CMYK color gamuts.
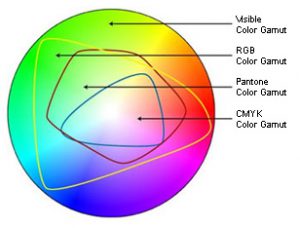
Color spectrum - RGB & CMYK gamuts
Color Gamut Comparison

In simplest terms, the colors available in the RGB color gamut (what you can see on your screen) are much greater than the colors available in the CMYK gamut (what can be printed). There are many ways print professionals try to minimize the color shift in the conversion from RGB to CMYK, but they are not all perfect solutions and some colors reveal much more visible differences than others. While the RGB gamut can display a large number of shades and nuances in darker blues, the CMYK gamut is more limited. In trying to reproduce those faint differences, the cyan and magenta used to create the blue with ultimately blend toward purple. Understanding this way back at the point of inspiration and design is essential to avoiding disappointment at the point of print.

One of the most standard ways to guard against unwanted results (like purplish blues) is to base designs in the Pantone® Matching System library of colors. If you define the blue in your design as a specific PMS blue, then your printer will know, and then be able to take steps to match the color against this “universal” standard. You will both have a standard against which to measure your blue. It is like a built-in instruction of how the color should be rendered.
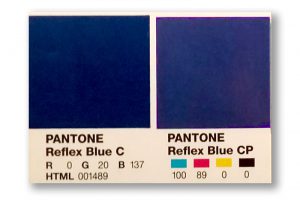
Reflex Blue Swatch v. ProcessDefining a “spot blue” in your work does not mean you must always print offset, using the spot ink. Still, it gives your printer a marker of what you intend that blue to be at output. Now here comes the next hurdle – you will need to take into account the color shift that will happen when printing a PMS-defined color in CMYK. Again, we can thank the differences in color gamuts for that. For many colors, the shift is slight – for others it can be significant. Designers and printers should be able to show you both color swatches of the PMS color you chose, and of any color shift that will occur from switching to the CMYK equivalent of that color.

And not to make things seem even harder, but color perception is also influenced by a host of other issues. The type, color and material of substrate you are printing on can vastly alter certain colors. Specialty finishes like gloss overlaminates or UV coating can as well. Screen calibrations of monitors used in the design and proofing process can influence how colors appear, and the lighting where any screen or print is viewed is also a factor.

One more interesting phenomenon: metamerism. Without getting into the science behind the term, some colors that are actually different will appear identical to the human eye under certain lighting conditions and different under others. There are at least 12 conditions that can create this metamerism: light, angle of view, size, distance, time, scenery, gloss… even differences in the human eye itself. 

So what about that problem with dark blues? If you are using blue in your logo or designs, and are concerned about a color shift toward purple, be certain that the cyan and magenta values in the CMYK definition of your blue color vary by at least 30% (some recommend 40%). Anything less than that, especially with dark colors, and the blue and red will mix to render purple – it is just a fact of physics. 

Knowing these types of technical color issues is important if you choose to buy your print online from a large, bulk print provider. They will print exactly what you sign off on when you submit your file. When you work with your local printshop, a good relationship between you, your designer, and your printer will bring you a team approach to getting the exact color you want on all your valuable marketing.  

Call us at 828.684.4512 for any marketing needs. As a printer, we understand communication, design, and teamwork. Your printer should be able to provide you with the latest information, inspiration, technical advice, and innovative ideas for communicating your message through print, design and typography, signage, apparel, variable data printing and direct mail, integrated marketing and environmentally responsible printing. If they can’t, you have the wrong printer! The best advice, always, is to ASK YOUR PRINTER!

ImageSmith is now partnered with Extreme Awards & Engraving – our in-house partner providing custom engraved trophies and awards for employee recognition programs, sporting events, and promotional needs. With our new sister company, we will be sharing space, resources and expertise in a collaboration designed to further provide you with one place to meet all of your marketing needs… Under One Roof! Visit them online at www.extremeae.com or call direct at 828.684.4538.


ImageSmith is a full-service print and marketing provider located in Arden, North Carolina. Contact us at ImageSmith for quotes on all your print and marketing projects, and more useful tips on how to create custom, effective, high impact marketing solutions.

Using Templates to Design – Print, Promo Products & Signs


Designing on templates

Trade show booths, converted envelopes, coffee mugs, die cut folders, POS displays, folded mailpieces… what first step do all these design projects share? In each case, you will want to ask for a template from your printer before you design.

The print, signage and promotional products world continues to diversify with custom branding opportunities that allow you to print on just about any object you could want. Throw in the creative use of die-cuts, spot coatings, textures, and folds and starting your project layout on the right foot becomes all the more important. For the designer, that means working with vendor-supplied templates to make sure your design ends up printing in the right spot with no expensive surprises or added cost.

Vendors are usually glad to supply a pre-press template for your specific project. In fact, many require your files be submitted on their template – and for very good reason. The positioning, size, and bleed area are critical for successful output on projects using various substrates and printing surfaces, and complex bindery or finishing processes. When you submit files that need no adjustments, you save prepress and art department fees that would be needed to correct or modify your files, or perhaps save having to pay for a job that did not print as you hoped.

Often, however, instructions are vague about exactly HOW to work with the template. Here are a few pointers that may help. In MOST cases, the template you will receive is a PDF. If you are using the most common desktop publishing software – anything from Quark Xpress to the Adobe Creative Cloud Suite – the PDF can be used in several ways to guide your layout without getting in the way of your work.

We love Illustrator for many great reasons and it is generally our preferred software for design of promotional products, wide format signage, vehicle wraps, and even some regular print jobs that have complex die cuts or folds. The PDF template can be placed into Illustrator like an object, on its own layer, and used as a guide. But the most helpful way is to begin by choosing File–Open With (rather than just File Open) and pick Illustrator as your app rather than Acrobat. (If, as sometimes happens, the template PDF uses fonts that your computer does not have, just ignore the warnings. While they may not print well on your end, the vendor who made the template will have them, so no problem.)

Trade show booth template

Templates are almost always vector objects that will open and be editable in Illustrator. Of course you don’t want to edit the template, but it can be helpful to have the ability to manipulate it when using many layers or when you need to hide parts of the template in order to proof your project to a customer. You may also need to copy and use curved shapes or other features of the template when creating masks or other design elements.

Layers palette in IllustratorMany PDF templates are very user-friendly in Illustrator. They use specific non-printing colors to designate the layout and help you see the placement of things like folds, edges and dyelines while specifying how much bleed area you need to allow as well. They will generally have the template elements on locked layers so you don’t accidentally edit them. Most have a blank layer already prepared for you to work on. If not, always leave the template on it’s own layer(s) and create a new layer to contain your print elements.

Layers palette in InDesignSometimes, it is preferable to prepare your layout in InDesign or another page layout application. You can simply File–Place the PDF template into your document. It makes sense to create – and lock – a layer just for the template file. You can then turn visibility on and off as needed and move it up or down in the layer order as well. Your document size in InDesign should be the same size as the entire template, including crop marks if applicable. Upon export, you would generally turn all fonts to outlines and create your PDF/X1A with no crops or bleeds other than whats included in the template.

These PDF templates generally include other important information to guide your design. They will specify whether you need to use PMS spot colors or stick to all process. They define needed bleed area. And they usually spell out the resolution, size, and embedding specs for any images you include.

Templates save time, headache, and money throughout the course of your design project. Make it a practice to ask ahead of time for a template, and make the template your friend.

Call us at 828.684.4512 for any marketing needs. As a printer, we understand communication and design. Your printer should be able to provide you with the latest information, inspiration, technical advice, and innovative ideas for communicating your message through print, design and typography, signage, apparel, variable data printing and direct mail, integrated marketing and environmentally responsible printing. If they can’t, you have the wrong printer! The best advice, always, is to ASK YOUR PRINTER!

ImageSmith is now partnered with Extreme Awards & Personalization – our in-house partner providing custom engraved trophies and awards for employee recognition programs, sporting events, and promotional needs. With our new sister company, we will be sharing space, resources and expertise in a collaboration designed to further provide you with one place to meet all of your marketing needs… Under One Roof! Visit them online at www.extremeae.com or call direct at 828.684.4538.


Call us at 828.684.4512. ImageSmith is a full-service print and marketing provider located in Arden, North Carolina. Contact us at ImageSmith for quotes on all your print and marketing projects, and more useful tips on how to create custom, effective, high impact marketing solutions.

Quick InDesign Tip: Discover the Story Editor


InDesign Story Editor

Many InDesign users may primarily work on image heavy, single page documents such as flyers, office stationary, business cards, posters or ads. But if you have ever found yourself in charge of laying out significant amounts of text for projects such as annual reports, directories, or even your great American novel, the often-overlooked Story Editor in InDesign can be your best friend.


Toolbox for PageMaker 4.0, before Adobe Systems purchase
The Aldus PageMaker 4.0 Toolbox

Like most every feature in an Adobe product, you will discover layers of functionality the deeper you decide to explore. This article intends to just open the door on a feature that is a little bit hidden. Back in the days of PageMaker, the InDesign predecessor originally produced by a company named Aldus, manipulation of text was the heart and soul of the program. Tools to import and arrange graphics and photos were essential and expanding with every upgrade, but PageMaker’s “reason to be” was styling and control of text and the Story Editor was it’s powerhouse. Whenever you work with large amounts of text, it still is today.

Artwork from PageMaker Story Editor

The most basic function of the Story Editor is to allow you to see overset text that fills up a text frame or page without having to go ahead and flow the rest of your text onto new pages or off on the pasteboard area. Click within a block of text and hit Command+Y (Ctrl+Y) or Edit > Edit in Story Editor to open up your text in its own window. Think of it like a “word processor” view of the entire placed text, scrollable even for hundreds of pages in one long view. (The original Aldus software manual described the Story Editor as “PageMaker’s word processor.”) This view of your text does not show line breaks, styling (other than basic bold, italic, underlined), or other design/layout attributes – what you get is the raw complete text where you can write, edit, correct, search and manipulate without the distractions of the layout. (If you are familiar with WordPress, the Story Editor is similar to the Text or HTML view rather than the Visual tab.)

From this window you can work on large amounts of text flow in a multi-page document. If you are still writing your content, or just searching out edits and corrections, this view gives you the control to write and edit without turning pages, screen redraws, or design distractions. If you ever find yourself confused as to why a portion of text is not “acting” as expected, check the Story Editor to see any hidden text variable or markers such as Drop Caps, Index Markers or Hyperlinks. Often you can delete or edit these here much easier than in the normal layout view. Even if you are just working on text that is difficult to see on screen due to size, rotation or special effects, a quick Command+Y will let you see and edit the text in a straightforward window and the changes will update live in both displays. The Story Editor is also the place to manage more advanced tricks like footnotes, XML or tagged text, and conditional text.

Open your Story Editor just to get a feel for how it can benefit you in your own style of working with InDesign.

Story Editor Preferences Pane
Set the font and appearance for your Story Editor view

Be aware that each independent text block or series of linked blocks will open its own Story Editor window – there is not one single Story Editor for an entire Indesign document. Also know that you can customize the look and display of your editor from the InDesign Preferences/Story Editor Display window. Take a few moments to explore the Story Editor and save yourself a lot of time, clicks and frustration on future design jobs.


Call us at 828.684.4512 for any marketing needs. As a printer, we understand communication and design. Your printer should be able to provide you with the latest information, inspiration, technical advice, and innovative ideas for communicating your message through print, design and typography, signage, apparel, variable data printing and direct mail, integrated marketing and environmentally responsible printing. If they can’t, you have the wrong printer! The best advice, always, is to ASK YOUR PRINTER!

ImageSmith is now partnered with Extreme Awards & Engraving – our in-house partner providing custom engraved trophies and awards for employee recognition programs, sporting events, and promotional needs. With our new sister company, we will be sharing space, resources and expertise in a collaboration designed to further provide you with one place to meet all of your marketing needs… Under One Roof! Visit them online at www.extremeae.com or call direct at 828.684.4538.


Call us at 828.684.4512. ImageSmith is a full-service print and marketing provider located in Arden, North Carolina. Contact us at ImageSmith for quotes on all your print and marketing projects, and more useful tips on how to create custom, effective, high impact marketing solutions.

EDDM – Is Every Door Direct Mail Right For You?

EVery Door Direct Mail Simplified

The USPS direct mail program called Every Door Direct Mail, begun in 2011, makes saturation mailing affordable for small businesses. Offer coupons, publicize events, send thanks, announce sales or online promotions, and discover new customers from areas you target – all at the lowest price ever.  However, as with all things postal, you may also encounter a few potentially confusing rules and paperwork. Read on for a little clarification…

What is Every Door Direct Mail?

EDDM is a USPS program that seeks to make direct mail easier and less costly for small businesses. Using EDDM Retail, you send your mailpiece without a list of addresses or a permit to every address in targeted areas (carrier routes) which you select. Each printed mailpiece will be exactly the same (i.e., no cost for variable data addressing, no individualized addresses). Customers go online and use the USPS EDDM Retail program to select carrier routes and generate necessary paperwork. Of course this saturation mailing has some limitations: you can only mail 5,000 pieces per mailer per day, your piece must meet the specs for a standard machinable flat, your piece must be printed with the correct EDDM indicia, and you must bring the mail physically to the Post Office that services the carrier routes you chose. Also you must fill out the requisite postal forms and labeling, as well as follow bundling and packaging requirements. You can read more online at usps.com/everydoordirectmail.

What is the Difference between EDDM Retail and EDDM BMEU?

BMEU stands for Business Mail Entry Unit. EDDM BMEU allows larger businesses who already maintain a mailer’s permit for payment and tracking of their direct mail to use their permit and to drop off their EDDM to the Business Mail Entry Unit. With this method, mailers are not limited to 5000 pieces per day and the rules for what type of mailpiece qualify are more flexible.

While you can go it alone with the Post Office online, EDDM may be a daunting task for anyone new to bulk mail. (You can check out details of the USPS program online here.) The USPS has posted an in-depth video presentation on the EDDM service. We have broken the video into two parts and you can watch them by clicking the video links:

Every Day Direct Mail Video 1
Watch the EDDM video part one

Every Day Direct Mail Video 2
Watch the EDDM video part two

What are the Benefits of Every Door Direct Mail?

Every Door Direct Mail service lets your business send advertising without the need of an address list or the cost of addressing. The USPS rate for EDDM averages $0.175 per piece! A letter carrier delivers your piece along with the day’s mail to every address on the routes you choose. EDDM allow you to:

  • TARGET every address
  • REDUCE production costs
  • SIMPLIFY the mailing process

Discover the Possibilities…

  • Invite customers to a Grand Opening or Open House
  • Offer timely coupons or promotions
  • Announce events & sales
  • Publicize your participation in community events
  • Highlight your hours of operation, new services,
  • menu, mission statement or products
  • Emphasize your location and enhance your brand
  • Thank customers for their patronage

EDDM helps retailers and service-based businesses reach their local target customers – a good fit for the following:

auto dealers and repair shops  •  restaurants  •  pharmacies
clothing stores  •  furniture dealers  •  flower shops
coffee shops  •  bakeries  •  attorneys  •  schools  •  real estate firms
health-care professionals & practices  •  dry cleaners  •  home-improvement companies

Downside?

EDDM paperwork
There’s always paperwork involved!

Perfect for some businesses and some direct mail objectives, EDDM is not always the smartest option for everyone. Why? In general, targeted direct mailings – where you “edit” your mailing list for various factors such as age, income, and lifestyle of the folks you want to reach – produce greater results and therefore greater profits. Consider these situations: if you are a restaurant and want to get coupons out into the hands of locals who pass by your place daily and are the most likely to stop in, EDDM saturation mailing could be your smartest approach. But if you are a business selling products specifically for the elderly or homebound, sending mailpieces to every address in a neighborhood could be a waste of your investment. A targeted mailing to only elderly or disabled residents in a wider area would yield more positive results.

Best advice?

Talk to your printer about which mailing strategies will work best with your budget and your direct mail goals. Rely on their experience with the USPS and with integrated marketing to make your life a little easier… and more affordable.

Contact us at ImageSmith to get started with Every Door Direct Mail today. You choose, through the USPS site, exactly the areas you wish to saturate with your mailing and we’ll handle all the paperwork, packaging and regulations. No mail list, no hassle, and – if you decide to take advantage of EDDM BMEU – no need to apply for a postage permit, you can use ours at no added cost.


PhotoShop Makes it Easy to Quickly Straighten a Scan or Photo


If you begin work with a raw photograph or scan, chances are the image will be off-kilter – maybe just a little bit crooked, maybe a lot. Here’s an easy fix to straighten your image that does not require guesswork of how many degrees or rotation are needed.
Photo in need of alignment

In the sample image above, the subjects appear to be walking up a slight hill, but our objective is to have them on level ground. Beginning with CS5, the PhotoShop tools got a whole lot smarter and you can now Straighten a photo with the click of a button. The Crop tool itself will allow you to manually rotate the image, just by clicking slightly outside the crop area and pulling the image in whatever direction you desire. To have PhotoShop straighten your photo exactly, just click the “Straighten” button in the Toolbar at the top. This accesses your Ruler tool to draw a line on your image that you want to use to make your image plumb. The new tools make what use to be a more difficult task very intuitive and easy.
The “old” way of doing this was to get the Ruler tool (its hidden away on the fly-out menu of the Eyedropper tool). Find a line or edge in your image that you want to be perfectly horizontal.  Click and drag out a line with the ruler tool that you want to be exactly 90° perpendicular to vertical. Choose Image – Rotate – Arbitrary. The exact amount of rotation needed (to the 100th of a degree!) will be entered into the “Arbitrary” amount box. Just hit enter and your image will rotate clockwise or counterclockwise as needed according to the line you drew.

Using the Ruler Tool in PhotoSHop
Find the “horizon” or edge you want to be perfectly horizontal in your image and drag the ruler tool across it.

Rotate Image in PhotoShop
Image – Rotate Image – Arbitrary

Rotate Image in PhotoShop
The exact amount needed is automatically filled in the Rotation Amount

Straightened Image before recropping
Image aligned with drawn line, before recropping.

Finished photo after alignment

After aligning, you will need to recrop the image to make it square again. But the girl walking her dog is now on level ground. If your image was a scan of a document or printed photograph, aligning with the edge of the original will bring the image plumb again.

Thanks to CS5 and beyond, you may never need this again!


Strive to buy your print locally! A community printer will understand communication and design, with a special emphasis on your local market. They should be able to provide you with the latest information, inspiration, technical advice, and innovative ideas for communicating your message through print, design and typography, signage, apparel, variable data printing and direct mail, integrated marketing and environmentally responsible printing. If they can’t, you have the wrong printer! The best advice, always, is to ASK YOUR PRINTER!


Call us at 828.684.4512. ImageSmith is a full-service print and marketing provider located in Arden, North Carolina. Contact us at ImageSmith for quotes on all your print and marketing projects, and more useful tips on how to create custom, effective, high impact marketing solutions.

Designing Product Labels: Stick a Label on a Bottle with Illustrator and PhotoShop


Creating a wine label in Illustrator and Photoshop

OUR PROJECT: design a label and show it in use on the actual product. We need to create print-ready label files AND on-product demos for proofing those labels – a very common scenario for the designer. Moreover, our goal is also to end up with a usable set of files that are organized, fully editable and ready to be repurposed for any integrated marketing projects that lie ahead. What is the best approach for digitally sticking a label on a bottle?

We love Illustrator.  The ability of vector artwork to be edited, printed in spot colors, redefined for other purposes and resized to any dimension without loss of resolution or quality makes it a versatile winner for multipurpose projects. On the other hand, PhotoShop is essential for realistic product presentation. Amazing effects can take a vector label file from the design stage to a true retail appearance and on-product photo. Using both programs in a coordinated way will leave you with a flexible set of files that can be used for offset or digital printing, wide format product displays, realistic proofing and any other application you might need. When you return to prepare other labels, these files are invaluable time-savers.

The label design for this whiskey bottle began in Illustrator. The customer’s requirements were a matte finish paper with a die cut shape. The handiest solution was to create the label in Illustrator, then manipulate that file into PhotoShop for the proofing and on-product look. Here, all of the type and design elements were created as vectors in Illustrator, and assigned the PMS spot colors that would be needed for offset printing. This part of the job is essentially a typical design/print job.

Creating a wine label in IllustratorWhile working in Illustrator, it helps to be able to see your design on the actual bottle as you work. So, we placed the .tif image of the bottle on its own layer and locked it. An image of the paper was placed on another layer – just for reference – along with the outer shape of the label. We then made a clipping path of that shape on the paper layer so that with all layers turned on, the Illustrator file appeared like the finished label on the bottle – minus the PhotoShop effects. These two layers are not for print purposes – only to help you visualize the end product while designing. Play around with the design of the label until finished, turning off the “bottle” and “paper” layers as needed. From this file, we can generate any actual print files for production of the label.

Now – over in PhotoShop: we wanted to show the label on an actual bottle, both for proofing to the customer and to create imagery for use in several related projects (no special photoshoot necessary!) We start with the photo of the bottle itself. This image is much larger in size than the actual bottle, being a high resolution image suitable for wide format output. If you have worked in Illustrator at the actual label size, you will need to enlarge the vector design when you bring it into PhotoShop – no problem as vectors can be easily resized with no loss of quality. Copy the parts you want to use in Illustrator and paste into their new PhotoShop layers as Smart Objects. By working with Smart Objects in this way, you can double-click on your layer and the artwork will open in the native application (in this case, Illustrator) for editing. When done, click save and the art updates in your PhotoShop file. Learn more about how great Smart Objects are for design versatility here.

Tip: be sure and carefully name each layer you create. I often think I will remember which is which, only to wind up confused and searching through layers one by one to see what I have created. You can easily use dozens of layers in one simple project, so take the time to name them as you create them.

For certain effects to work in PhotoShop, you must rasterize the Smart Object layer before you can proceed. If you are unsure and want to do that safely, make a copy of your Smart Object layer and turn its visibility off – that’s your backup. Now rasterize the original layer and proceed. You can always trash that if the results aren’t right and turn back on the layer you saved. Here, we brought in vector pieces of the label in different groupings so as to be able to apply various lighting effects and filters on different parts, hopefully recreating the appearance of a realistic label. You can experiment with various layers to find which works best for your project. In this case, all the ink coverage (the red bar, the type, the logos) were kept together in order to use a light reflection effect on them that would simulate the ink on paper. Using Photoshop to create Wine LabelThe outer border required a different look, as it was set to print in metallic ink. We brought in a layer that looked like gold foil and a layer which held the label frame as a Smart Object. First we selected the pixels on the frame layer and turned its visibility off, switched over to the foil layer, selected the inverse and deleted. What was left is the shape of the frame, but filled with the reflective foil (see photo at right). As this is not a Smart Object layer, you can go ahead and apply bevel and emboss effects to make it stand out a little more from the rest of the matte label.

Save this heavily layered version of your project – it allows you to easily edit individual parts during proofing or for future applications. You could easily switch out the paper layer, substitute a silver background, entirely redesign the label, or even insert a new bottle and background. By starting off on the right foot, you can confidently edit and repurpose your designs with a minimum of wasted or repeated effort.


Strive to buy your print locally! A community printer will understand communication and design, with a special emphasis on your local market. They should be able to provide you with the latest information, inspiration, technical advice, and innovative ideas for communicating your message through print, design and typography, signage, apparel, variable data printing and direct mail, integrated marketing and environmentally responsible printing. If they can’t, you have the wrong printer! The best advice, always, is to ASK YOUR PRINTER!

Call us at 828.684.4512. ImageSmith is a full-service print and marketing provider located in Arden, North Carolina. Contact us at ImageSmith for quotes on all your print and marketing projects, and more useful tips on how to create custom, effective, high impact marketing solutions.

What’s New in Illustrator CC 2014: Live Corners & Friendlier Pen and Pencil Tools


New features in Adobe Illustrator CC 2014

Illustrator CC 2014 brings graphic designers some cool new improvements to enhance the “drawing” experience of this vector program. I’ve always loved using Illustrator, although the disconnect between the feeling of drawing on paper vs. fashioning a vector shape onscreen can seem awkward. The new Illustrator perks: a more user-friendly Pen and Pencil tool and the new Live Shapes/Corners functionality give much more accessible controls to vector drawing and design. The best part of these new improvements? They are very intuitive. While an explanation or overview is helpful to know what has changed, the best way to understand them is to just get in there and create! The new tweaks will become second nature to a user with previous Illustrator experience in no time.

Live CornersInset Widget on Live Corners in Illustrator what a great enhancement for drawing and manipulating shapes! While this feature does nothing that was not possible in earlier versions of Illustrator, the sense of control is now much more integrated into the actual drawing process. Selecting any shape, or point on a shape, with the Direct Selection tool will reveal an on-art control point or “inset widget” at each of the corners. You can drag that widget to alter the shape of the corner. Double clicking the widget will open your dialog box for controls over the corner style (round, inverted round or chamfered), the corner radius dimension, and rounding that is Absolute or Relative. Option (or Alt) clicking will toggle between the three styles. Adobe offers some easy online video tutorials to cover all these features, but the process is so intuitive, just playing around with the new features is your best teacher. (BTW, I learned a new word with that “chamfered” corner feature.)

The Pencil Tool fly-out menu in IllustratorThe Pencil tool, in CC 2014, has advanced away from being more of a freestyle drawing tool often relegated to imprecise sketching and moved more toward a companion of the Pen tool. Double clicking the Pencil tool in the Tools palette will bring up its Options where you can set the fidelity of the line you are creating to the actual movement of your cursor. This is a great way to smooth curves when needed, or to create sketchy curves when that is point. Holding down your Option (or Alt) key will constrain the Pencil tool to a straight line; holding down the Command (or Ctrl) key will constrain it to horizontal, vertical or 45° angles. As you can see, this is very much like the Pen tool. The Pencil tool also toggles out to access the Smooth and the Path Erase tools. The Smooth tool is a handy way to touch up a path shape with which you aren’t quite happy. It subtracts excess points and contours to create a smoother shape. The Path Erase tool is your eraser, pure and simple – even stopping mid-segment to create a new end point.

The CC 2014 Pen tool sports some major enhancements as well. Pen Tool Path PreviewOne change you will notice right away is the Pen tool Path Preview. When drawing a shape, it is helpful to see exactly where the path will fall before dropping the point onto the document; this new tool previews that path for you with a colored preview line extending from the last point dropped to the position of the pen before you click in a new point.  Adobe also gave us advancements on the manipulation of anchor points: repair broken anchor point handles, draw uneven handles when needed, and other new ways to finesse closing the shape of a path without distorting your drawing. The Pen tool in Illustrator has always been one of those tools that really needs hands-on practice to understand. Often the description of what or how the tool works is longer and much more confusing than the actual process of using it. So dive in – the new features will become second nature as you use the tools and incorporate the new perks into your work routine.

Launching Illustrator CC 2014 will bring up a Welcome screen that does a great job in introducing everything you need to know: the tabs for New Features, Getting Started, and Tips & Techniques include video tutorials and links to the great online library of Adobe help documents. (You can always access this screen when needed by going to Help – Welcome in the menu bar.) Have fun making some great vectors.


Strive to buy your print locally! A community printer will understand communication and design, with a special emphasis on your local market. They should be able to provide you with the latest information, inspiration, technical advice, and innovative ideas for communicating your message through print, design and typography, signage, apparel, variable data printing and direct mail, integrated marketing and environmental responsible printing. If they can’t, you have the wrong printer! The best advice, always, is to ASK YOUR PRINTER!

Call us at 828.684.4512. ImageSmith is a full-service print and marketing provider located in Arden, North Carolina. Contact us at ImageSmith for quotes on all your print and marketing projects, and more useful tips on how to create custom, effective, high impact marketing solutions.